Aim:
This tutorial is for beginners in the field of microcontroller. In this case the microcontroller is Arduino, a reprogrammable derivative of Arduino. This purpose of this tutorial is to familiarize with the use of push button switch with the microcontroller.

Description:
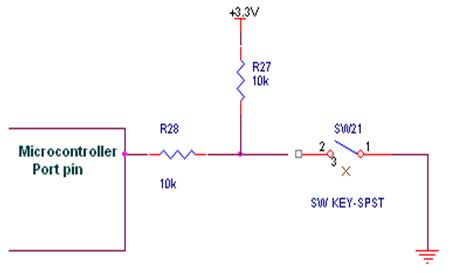
Fig. 1 shows how to interface the switch to microcontroller. A simple switch has an open state and closed state. However, a microcontroller needs to see a definite high or low voltage level at a digital input. A switch requires a pull-up or pull-down resistor to produce a definite high or low voltage when it is open or closed. A resistor placed between a digital input and the supply voltage is called a “pull-up” resistor because it normally pulls the pin’s voltage up to the supply.

Fig. 1 Interfacing switch to Microcontroller
We now want to control the LED by using switches in Arduino Development board. It works by turning ON a LED & then turning it OFF when switch is going to LOW or HIGH
Block Diagram

Schematic
Code
// ****************************************************
// Project: Interfacing single switch to Arduino
// Author: Hack Projects India
// Module description: Operate Switch
// ****************************************************
const int buttonPin = 2;     // the number of the pushbutton pin
const int ledPin =  13;      // the number of the LED pin

// variables will change:
int buttonState = 0;         // variable for reading the pushbutton status

void setup() {
  // initialize the LED pin as an output:
  pinMode(ledPin, OUTPUT);
  // initialize the pushbutton pin as an input:
  pinMode(buttonPin, INPUT);
}

void loop() {
  // read the state of the pushbutton value:
  buttonState = digitalRead(buttonPin);

  // check if the pushbutton is pressed. If it is, the buttonState is HIGH:
  if (buttonState == HIGH) {
    // turn LED on:
    digitalWrite(ledPin, HIGH);
  } else {
    // turn LED off:
    digitalWrite(ledPin, LOW);
  }
}

No comments:
Post a Comment